Set up your server

You already purchased a server — now you need to set it up, which includes the administrative stuff like your username and password.

  1. Log in to your IFindHost – CheapDomainRegistration.com account.
  2. Click Servers.
  3. Next to the server you want to use, click Manage.
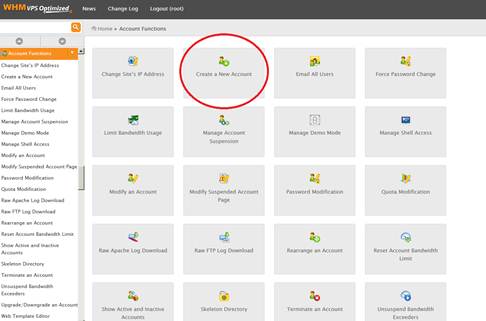
  4. In the section for the server you want to use, click Set Up.
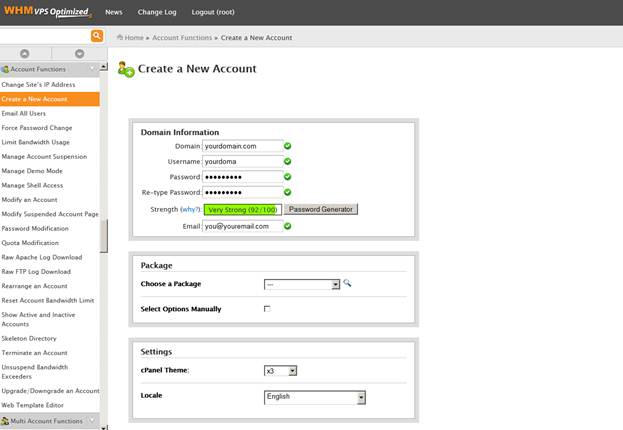
  5. Complete the following fields, and then click Create:
    Field What to do…
    Server name Enter a name to refer to your server by.
    User name Enter a user name to log in to your server.
    Password &
    Confirm Password
    Enter a password to log in to the server.
    Data Center Region [Coming soon] Select the location where you want to create your server.
    Image Select the operating system you want to use.
    Control Panel Select the control panel you want to use.1
    Import your sites Select any cPanel shared hosting accounts you want to import (more info).

Not all control panels are available on all images/operating systems. For example, you cannot select cPanel if you want to use Fedora on your VPS. To use the control panel, you must select a compatible image/operating system.

Am I using My Servers or the Hosting Control Center?

We have two different interfaces to manage our servers:

  • My Server is our current management interface
  • Hosting Control Panel is our older system
  1. Log in to your IFindHost – CheapDomainRegistration.com account.
  2. Click Servers.
  3. Reference the following table to determine which interface your server uses, based on the product description that displays beneath your server’s name:
    Label Interface
    [TierManaged VPS [Operating system] My Server
    Virtual Private Server My Server
    [X]GB Dedicated Server My Server
    Virtual Private Hosting [Operating system] Hosting Control Panel
    [TierDedicated Hosting [Operating System] Hosting Control Panel
    Dedicated Server (monthly) Hosting Control Panel

Example values of [Tier] include:

  • Value
  • Economy
  • Deluxe
  • Premium

[Operating System] will either display as:

  • Linux
  • Windows

What if I’ve reached my bandwidth limit?

Bandwidth is a measurement of the amount of data allowed to pass between a user’s website and the rest of the Internet. Bandwidth includes all incoming and outgoing data transfer from your server including but not limited to web traffic, ftp usage, all emails passing through our mail server, etc. Each VPS and Dedicated Server plan comes with a certain amount of bandwidth per month, measured in gigabytes (GB).

If you exceed your server’s bandwidth allotment, you will be subjected to bandwidth overage charges.

We suggest taking the proper measures to prevent bandwidth overage.

At any time you can review your server’s bandwidth usage. See Review your bandwidth usage.

If you are expecting an increase in web traffic, you can purchase additional bandwidth as a recurring billing service. See Add bandwidth.

Bandwidth Overage Protection shields you from bandwidth overage charges by automatically suspending your account when its allotted bandwidth is exceeded. Reinstatement occurs at the start of your next billing cycle or when additional bandwidth is purchased. See Adding Bandwidth-Overage Protection to Your Server and Adding Bandwidth-Overage Protection to Your Server.

Patching Your Server

To protect yourself from security vulnerabilities, you must patch your server regularly. Developing a monthly or weekly habit of performing this simple task can save you a lot of grief and hassle later on.

 Note: Managed Hosting and Assisted Service Plan customers do not need to patch their own servers.

The process to patch your server depends on what operating system your server uses:

Fedora or Cent OS

  1. Connect to your server via SSH (more info).
  2. Switch to the root user (more info).
  3. Run the following:
    yum clean all
    yum update

Ubuntu

  1. Connect to your server via SSH (more info).
  2. Switch to the root user (more info).
  3. Run the following:
    apt-get upgrade

Windows Server

  1. Connect to your server via RDC (more info).
  2. From the Start menu, select Control Panel.
  3. Click Windows Update.
  4. Click Check for Updates, and then complete the steps to update your server.

Reset your password

If you forgot your server’s password, we can help you reset it.

 Warning: If you forget a dedicated server’s password (i.e. not a VPS), we can provide it to you over the phone. Please call the Support number listed on our help page.

 Note: If you know your password and want to change it, see Changing Your Server’s Password.

  1. Log in to your IFindHost – CheapDomainRegistration.com account.
  2. Click Servers.
  3. Next to the server you want to use, click Manage.
  4. In the Support section, select Reset Password.
  5. Enter your new password. Allow the system up to 30 minutes for the change to take effect.

Restart your server

If you cannot reboot your server manually, you can restart it by requesting a power cycle.

  1. Log in to your IFindHost – CheapDomainRegistration.com account.
  2. Click Servers.
  3. Next to the server you want to use, click Manage.
  4. From the Support section, click Request Power Cycle.
  5. Review and confirm your request.

 Note: Please allow up to 30 minutes for your Virtual Private Server (VPS) to fully reboot and up to 1 hour for your dedicated server to fully reboot.

Next step