Website Security and Backups – Dive in: Browse essential articles list

Here’s a list of most of Website Security and Backup’s Help articles. Use it as your guide — from setting up Website Security, to getting your website clean, to making sure you have a daily backup of all of your hard work.

First steps

Set up your Website Security plan and scan your website.

WAF configuration

If you are using an Express, Deluxe, or Ultimate plan, you may need to configure the WAF.

Clean up your website

If malware is found on your website, there are additional steps you’ll need to take after remediation is complete.

Website Backups

You will need to configure your Website Backups so you are protected from data loss, and have the ability to restore your website at a later date.


You Can Backup Your Website Easily – “Backup my website”

 Note: Your site is automatically backed up whenever you publish it, select a new theme, or restore it.

  1. Log in to your Cheap Domain Registration account and open your product. (Need help opening your product?)
  2. Click Edit Site, then click the three-bar icon in the top right corner of your screen and select Site Settings.
  3. Click the Backup/Restore tab, and then click Create Backup.
  4. Once the new backup is created, click OK to close the window.

 Note: Website Builder stores up to five manual backups, replacing the oldest one each time. Automatic backups do not count as part of your five manual backups. There’s no time limit on using the backups. To use a backup to recover your site, see Restore Site from Backup Files. (In version 6, go to Site tab > Manage tab > Backup/Restore.)

Add scripts and HTML code to your website to display custom page elements, such as third-party apps

You can add JavaScript and HTML code to your website to display custom page elements, such as third-party apps.

  1. Log in to your Cheap Domain Registration account.
  2. In your Products list click Website Builder, and then click Managenext to the account you want to use.
  3. Click Design Your Pages.
  4. If necessary, from the Page menu, select the page you want to modify.
  5. Click Popular, and then drag and drop the Script icon over a Drop Zone. Drop Zones display on your Web pages when you hover over them.
  6. In the Enter JavaScript text box, delete the default scripting, and then enter your script.
  7. Click OK.
  8. Click Publish in the upper right.

For information about inserting JavaScript in Web page headers, see Setting Page Properties.

 Note: JavaScript does not execute in the Page Designer. You must use Preview mode to execute it.

To Add HTML

  1. Log in to your 1 account.
  2. In your Products list click Website Builder, and then click Managenext to the account you want to use.
  3. Click Design Your Pages.
  4. If necessary, from the Page menu, select the page that you want to modify.
  5. Click the content block you want to edit, and then click the  icon.
  6. Enter the HTML code you want to use.
  7. To ensure your HTML is formatted correctly, click Verify and Update HTML, and then click OK.
  8. Click Publish in the upper right.

You can add blog link or RSS feed

Adding a Rich Site Summary (RSS) feed to a Website Builder page lets you display another site’s blog posts as they’re updated. You also can use it to display posts from a blog of your own that’s hosted elsewhere. (You cannot use Website Builder itself to create or publish a blog.)

 Note: This feature uses an API (application program interface) that Google stopped supporting in late 2015. That means the feed widget is no longer reliable: It may work one day and not another.

  1. Log in to your Cheap Domain Registration account.
  2. In your Products list click Website Builder, and then click Managenext to the account you want to use.
  3. Click Edit Site.
  4. Select the page where you want to add the feed, in the left toolbar, click the Blog/RSS button, and an example blog is added to the page.
    Click Blog/RSS button
  5. Double-click the example blog window to open the Settings.
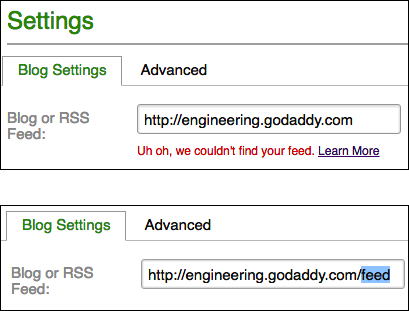
  6. Replace the sample address in the Blog or RSS Feed field with that of the blog you want displayed.
    If you see an alert, adjust address

     Note: If you enter the blog’s top-level address, such as xxxx.com, you may see an alert message below the field. Adding/feed/ at the end usually fixes that.

  7. Complete the other fields as needed:
    Other choices in Settings
    # of listings Move the bar to select how many posts you want to see on your site.
    Options Select if you want to show images and/or categories. (Categories are available only for Tumblr and Blogger blogs.)
    Layout Select how you want the posts to look on your site.
    Advanced
    Optional tab
    Click the tab to add or edit other effects such as Background colorBorder, and Shadow.
  8. Click Save and the window closes.
  9. Click Publish to update your site online.

Add Google analytics to monitor visitors to your website

Google® Analytics lets you monitor visitors to your website by adding code to your site. This service requires a Google Analytics account.

  1. Follow Google’s instructions to create a Google Analytics account.
  2. Copy the Tracking ID script Google Analytics generates. (More info at Google Support).
  3. Log in to your Cheap Domain Registration account.
  4. Click Website Builder and click Manage next to the site you want to use.
  5. Click Edit Site, then click the three-bar icon (Manage Settings) and select Site Settings.
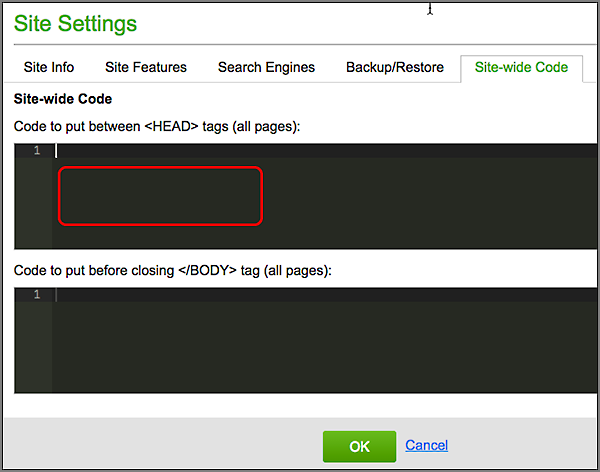
  6. Select the Site-wide Code tab, and then paste the HTML code into the top text entry field.
    enter code in field labeled Code to put between <HEAD> tags (all pages)
  7. Click OK, and then click Publish.

 Note: Once you complete the steps above, you should see data in your Analytics account within 24 hours.