Add image – Website Builder 7 Help

You can add images of your own, ones included with Website Builder, or from your social media sites.

 Note: Images need to to be formatted as .jpg, .jpeg, .gif or .png files. Image uploads are limited to 30MB per file. While images as large as 5000 x 5000 pixels can be uploaded, images will not be displayed larger than 1920 x 1080 pixels.

  1. Log in to your Website Builder account.
  2. Click Edit Site.
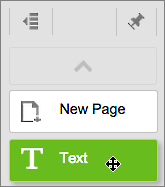
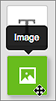
  3. In the left-hand toolbar, click the Image tool.
    Click and drag image tool onto page
  4. In the Choose Photos window, select one of the following options:
    Choose a photo source

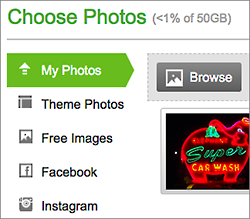
    Choose Photos
    My Photos Click one of the images in the grid or click Browseto select an image you want to upload from your own computer, and then click Open.
    Theme Photos Click to select one of the images included in the Website Builder theme already installed on your site.
    Free Images To select an image from our library of free images, enter a search term to find specific images in the library, or select a category from the All categoriesmenu.
    Facebook To import images directly from your Facebook® account, click Connect to Facebook, log in to your Facebook account, and then click Log In with Facebook To turn off the connection, you’ll need to log into Facebook again.
    Instagram To import images directly from your Instagram® account, click Connect to Instagram, log in to your Instagram account, and then click Log In with Instagram. To turn off the connection, you’ll need to log into Instagram again.
  5. After selecting the image you want to use, click Insert.
  6. If you need to reposition the image, click and drag it on the page.
  7. If you need to resize it, click and drag any of the blue squares along the image’s edge. The image will keep its proportions.
    Click and drag a blue square to resize image
  8. If you want to adjust the image in other ways, see Edit images below.
  9. When you’re done making changes, click Publish to update your site online.

Next steps

More info

Add text – Website Builder 7 Help

 Note: Under the European Union’s General Data Protection Regulation, websites are required to give visitors from all EU countries the option of accepting the placement of data files (cookies) in their browsers or leaving your site. You can use a text box for that purpose (like the one in Step 5), though you should seek legal advice about the exact text used.

  1. Log in to your IFindHost – Cheap Domain Registration. com account and open your product.  (Need help opening your product?)
  2. Click Edit Site and use the page menu to select a page to which you want to add a text box.
    Select page from menu
  3. In the left-hand toolbar, click the Text tool and a text box is added to the page.
    Click Text tool
  4. You can begin entering text in the box immediately. Or click and drag any of the six border boxes to resize the text boundary before you begin.
    Select and replace placeholder text

     Note: You also can copy and paste text from other documents into the text box. While you can copy and paste a Microsoft Word document into the text box, the font styling (font size, color, and bold, italic, etc.) will be lost.

  5. Click Preview to see how your text book looks, and if you’re ready, click Publish.
    Using text box to display cookie policy

Next steps

  • To change your text’s color, font, or styling, and other details, see Change text .
  • To change a text box’s background color, size, border, and other details, see Change text box.

More info

How to add a page – Website Builder v7

 Note: If you’re migrating from a Website Builder version 6 site to a Website Builder version 7 site, see the Note in Step 6.

  1. Log in to your IFindHost – Cheap Domain Registration. com account.
  2. In your Products list, click Website Builder, and then click Managenext to the account you want to use.
  3. Click Edit Site.
  4. Click the New Page button in the left-hand toolbar, fill in the Page name field and click Add.
    Name page and click add
  5. Select your new page from the page menu and click the pencil-paper (edit) button.
    Click pencil button
  6. In the Edit Page dialog, fill in the fields — including the Page filename field.
    Fill in fields

     Note: Use a Page filename that identifies your page’s specific purpose or content. (It need not match the Page name.) Keep it to 1-4 words, separating each with a hyphen or underscore. Include the file extension (.html or .php) only if you’re migrating from Website Builder version 6.
    Filename should identify page content or purpose

  7. When you finish adding page content, click Preview.
  8. When you’re satisfied with the results, click Publish, then click the confirmation window link to see the page live on your site.
    site live

Next step

More info

Setting up your website – Website Builder v7

Website Builder comes with site-building tools that don’t require technical skills or coding experience. You can choose from hundreds of themes with placeholder content and images to get started quickly.

  1. Log in to your IFindHost – Cheap Domain Registration. com account.
  2. Click Website Builder/InstantPage to see your website accounts.
  3. Next to the account you want to use, click Manage.
  4. Select a domain from your account, enter a domain name registered elsewhere, or create a sub-domain using a domain in your account for your website, and then click OK.

     Note: If your account was auto-setup, you can skip this step.

  5. Locate the theme you want to use for your website, and then click Select Theme. (If you hover your pointer over the thumbnail image and click Full Screen, you can get a better look at the theme’s design.)

     Note: Each theme has pluses and minuses, and it may take a couple of days before you know if it fits your needs. While you can change your theme at any time, none of the text and images you’ve added will be preserved. To avoid starting from scratch if you switch themes, you may want to “test drive” a theme with a minimum of your own text and images until you’re sure about it.

  6. On the Get Established page, enter your business name and contact email address. Optionally, you can add other information that will help us get your business found by your customers:
    Fill out the Get Established page

    • Business category: Select the category that best describes your kind of business.
    • Address: This makes it easy to generate a map of your location and help your listing appear in location-driven search results.
    • Phone: You can enter your current business phone number.
    • Connect social: You can also connect your Facebook and/or Twitter account to your website.
  7. When you’re finished, click Next.
  8. If this is your first time setting up Website Builder v7, we show you a quick video overview of its tools. When you’re ready, click Close Video to get started building your site. (Your work is automatically saved as you go.)
  9. When you’re ready, click Publish to present your site to the outside world.

Next step

Information for migrating my website from V6 to V7

If you own Website Builder v7 but haven’t yet migrated your v6 site’s content, here’s how to move over the text. Remember: The v6 content will not be accessible after you publish the new site.

 Note: Depending on your site’s size, this manual process can take a while. You may want to check out Options to migrate my website.

  1. Use your Web browser to display your published v6 site. (In other words, don’t launch the Website Builder v6 program.)
  2. In a separate browser window, log in to your IFindHost – Cheap Domain Registration. com account.
  3. In your Products list click Website Builder, and then click Managenext to your new account (not your v6 account).
  4. When your new Website Builder launches, select a theme for your new site.
  5. Create some empty pages to which you’ll move content from your v6 site. (See Add A Page.)

     Note: No need to spend a lot of time creating perfect pages — the goal is to move your v6 content over to the new site as simply as possible. You can rename and polish your v7 pages later on if you like.

  6. Create a text box on one of the new pages by clicking the Text tool in the left-hand toolbar. Drag the text box if you need to reposition it.
    Click the Text tool and drag a text box onto the page
  7. Switch to your v6 site’s tab/window, select the text on a page, and use Cntrl/Command+C to copy it.
  8. Switch back to the tab/window displaying your new Website Builder site, select the text box’s placeholder text, and use Cntrl/Command+V to replace it with the text copied from your v6 site.
    Replace v7 placeholder text with text from your v6 site
  9. Repeat these steps on each page of your v6 site until you’ve copied all the text to your new site.

     Note: Besides moving text, you’ll also need to re-upload your v6 site’s images to your new site. See Add image and Adding image slideshows and photo galleries.

  10. Because the v6 version (and its content) will no longer be available after you publish your v7 site, double-check to make sure you have copied over everything from the old site.
  11. After confirming that you’ve moved everything to the new site, you can publish it. (See Publish my website.)

Next step

More info

  • Unlike Website Builder v6, Website Builder’s current version doesn’t preserve your content when you switch themes. See Change themes.

Managing orders – Quick Shopping Cart

Orders are assigned and organized by invoice number. You can view and search for invoices on the Quick Shopping Cart® Manage Orders page. From this page, you can process orders for shipping, create shipping labels, add notes to the order, and various other individual and bulk order processing tasks.

All order processing begins from the Manage Orders screen. See Searching orders for information. Some tasks can be processed in bulk — that is, multiple orders can be processed at once. Other tasks can only be processed one order at a time.

Bulk Order Processing

These processes can be used on multiple orders at once.

  • Export Orders — Export one or more orders to an Excel® spreadsheet file. Select the orders to be exported, and then click Export Orders.
  • Print Invoices — You can preview and print one or more invoices, allowing you to enclose a copy of the invoice along with an order shipment. Select the invoices to be previewed/printed, and then click Print Invoices.
  • Address Labels — Add one or more shipping labels to the shipping labels list for subsequent printing or download to Excel. Select the invoices to be added to the shipping label list, and then click Add to Address Labels.

    If you’re ready to print or export the labels, click Visit the Address Labels page, and then click Download to Avery or Download to Excel.

  • Shipping — Select Edit Shipping Information to review and enter tracking numbers and ship dates for multiple orders, or select Mark as Shipped to mark selected orders as shipped. For more information, see Processing multiple shipments
  • Archive — Select Archive to archive orders you no longer want to view or factor into your reports. These might include orders you create for testing or canceled orders. For more information, see Managing Archives in Quick Shopping Cart.

Individual Order Processing

You can use these processes on individual orders.

  • Block IP — If you determine that a particular order is fraudulent, you can block the IP address where the order originated. Click  to update the order, click Block IP, and then click OK.
  • Print Preview — You can preview an invoice. Click  to view the order, and then click Print Preview.
  • Print Invoice — You can print an invoice. Click  to print the order, click Print Invoice, and then specify the printer.
  • Resend Email — You can resend an order confirmation. Click  for the desired order, and then click Resend E-Mail.
  • Process Payments — Orders purchased through PayPal®, PayPal Express, Chase Paymentech, or a payment gateway are automatically processed:

    You must manually process orders purchased by other means:

    • Processing Print and Call — When you receive payment on a Print and Call order, you can indicate that it’s paid. Click  for the order to be processed, in the Payment Information section, click Completed.
  • Update Shipping — You can update shipping information for an order. Click  to process the order, in the Shipping Informationsection, update package information or click Completed to indicate that the order has shipped.
  • Print Address Labels — Use this option to print shipping or other labels. Click  to process the order, in the Address Informationsection, select the address(es) to be exported, and then click OK.

     Note: Update Billing and Shipping Information here by clicking Edit.

  • Add Notes — You can add notes to the order. Click  to process the order, in the Admin Notes section, enter notes on the order, and then click OK.

You can enable fraud rules that automatically check specific criteria and verify authenticity when shoppers place a credit card order. If the order violates the fraud rule, we do not process the order. See Managing fraud rules for information.

To view a list of blocked IP addresses, from the Manage menu, in the Orders section, select Fraud Blacklist to display a list of the IP addresses that are currently blocked.

How to publish – Quick Shopping Cart

Publishing your Quick Shopping Cart storefront creates your Online Store and moves it to the Internet. The Publishing page lets you view changes made to your store since the last update, preview the store before publishing, and publish (or update) the storefront.

Whether publishing your storefront for the first time or updating your storefront, just click Start Publish. Before publishing, you can preview the site by clicking Preview Site.

Remember, the first time you publish, it may take 24-48 hours for your store to display on the Internet. This is because it takes time for your website to spread throughout the various Web servers that make up the backbone of the Internet (we call this Domain Name Server propagation).