
Workspace Webmail lets you customize its appearance and behaviors.
To Configure Your Display Settings
- Log in to your Workspace Email account and open your product. (Need help logging in?)
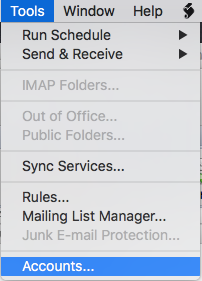
- From the Settings menu, click Display Settings.
- Go to one of the following tabs, make any changes you want, and then click OK.
Time
Set the time zone and date format, specify the amount of idle time that can elapse before the system logs you off, and specify how often to refresh your folders.
Viewing
- Display Attached Images — Display all image files attached to the email without downloading them to your computer.
- Enable Message Preview Pane — Display a window beneath your list of emails that lets you view an email by selecting it.
- Mark Messages as Read on Preview — Mark messages as read when viewing in the preview pane.
- View After Action — Select what you want to view after performing an action with a message, such as deleting or flagging it.
Composing
- Use Pop-up Compose — Select to view the Compose window in a new browser window.
- Use HTML Compose — Select to use the Rich Text editor when composing emails.
- Select Spell Check Tool — Select a spell-checking tool to use when composing emails.
- Always Spell Check Before Send — Select to automatically check spelling before sending messages.
- Default Message Font — Select the default font, size, and color for composing messages.
- Default Delay for Scheduled Email Deliver — Select a length of time to delay sending your emails.
- Put People I Reply to in My Address Book — Select to add contacts to your address book when you reply to an email from them.
- Unsaved Draft Protection — Select one of the following options for handling unsaved or unsent emails:
- Full — A pop-up window displays letting you Return to Message, Save as Draft, or Close without saving.
- Basic — A pop-up window displays letting you save the email in your draft folders.
- Off — Do not use any unsaved draft protection.
- Automatically Save Draft — Select the frequency that Workspace Webmail automatically saves drafts of messages you compose.
- Copy Email Messages to Sent Items When Sending Mail — Select when you want Workspace Webmail to save emails you send to your Sent Items folder.
- Include Reply by default when Sending and Filing — Select to have Workspace Webmail file your reply email when you use Send and File while replying to an email.
- Save a copy of message in Sent Items when Sending & Filing — Select to save your reply to the Sent Items folder when you use Send and File while composing email.
- URL Linking on Send — Select to automatically convert email address and Web addresses as clickable hyperlinks when you send email using the Rich Text editor. To ensure this works, select Use HTML Compose.
Calendar
If you have a Calendar account associated with your Workspace Webmail account, you can display your Calendar events and tasks in Workspace Webmail.
Select if you want to show events or tasks above your Mail index, and the number and types of items to display. Click OK to save the setting.
Action Bar
The Action Bar displays six actions when viewing your emails. You can customize these to fit how you use email by clicking and dragging action buttons from the Available Buttons menu to the Selected Buttons menu.
Themes
Select a color theme for your Workspace Webmail interface.
Other
- New Mail Sound — Select a sound to play when you receive new email.
- Open Each Application in a New Window — Select to view your WorkSpace applications in a new browser window when you go to that application’s tab.
- Delete messages immediately (Purge) and do not send to Trash folder — Select to purge all deleted messages instead of moving them to the Trash folder.
- Keep message selections after applying actions — Select to have messages stay selected after you apply actions to them.
- Enable 2nd Toolbar with These Items — Select the actions you want to display on a second toolbar, beneath the Action Bar.
- Enable shortcut keys — Select if you want to enable keyboard shortcuts in your Workspace Webmail.


 button to go back to the Settings screen.
 to open the app.