You Can Backup Your Website Easily – “Backup my website”

 Note: Your site is automatically backed up whenever you publish it, select a new theme, or restore it.

  1. Log in to your Cheap Domain Registration account and open your product. (Need help opening your product?)
  2. Click Edit Site, then click the three-bar icon in the top right corner of your screen and select Site Settings.
  3. Click the Backup/Restore tab, and then click Create Backup.
  4. Once the new backup is created, click OK to close the window.

 Note: Website Builder stores up to five manual backups, replacing the oldest one each time. Automatic backups do not count as part of your five manual backups. There’s no time limit on using the backups. To use a backup to recover your site, see Restore Site from Backup Files. (In version 6, go to Site tab > Manage tab > Backup/Restore.)

You can add blog link or RSS feed

Adding a Rich Site Summary (RSS) feed to a Website Builder page lets you display another site’s blog posts as they’re updated. You also can use it to display posts from a blog of your own that’s hosted elsewhere. (You cannot use Website Builder itself to create or publish a blog.)

 Note: This feature uses an API (application program interface) that Google stopped supporting in late 2015. That means the feed widget is no longer reliable: It may work one day and not another.

  1. Log in to your Cheap Domain Registration account.
  2. In your Products list click Website Builder, and then click Managenext to the account you want to use.
  3. Click Edit Site.
  4. Select the page where you want to add the feed, in the left toolbar, click the Blog/RSS button, and an example blog is added to the page.
    Click Blog/RSS button
  5. Double-click the example blog window to open the Settings.
  6. Replace the sample address in the Blog or RSS Feed field with that of the blog you want displayed.
    If you see an alert, adjust address

     Note: If you enter the blog’s top-level address, such as xxxx.com, you may see an alert message below the field. Adding/feed/ at the end usually fixes that.

  7. Complete the other fields as needed:
    Other choices in Settings
    # of listings Move the bar to select how many posts you want to see on your site.
    Options Select if you want to show images and/or categories. (Categories are available only for Tumblr and Blogger blogs.)
    Layout Select how you want the posts to look on your site.
    Advanced
    Optional tab
    Click the tab to add or edit other effects such as Background colorBorder, and Shadow.
  8. Click Save and the window closes.
  9. Click Publish to update your site online.

Add Google analytics to monitor visitors to your website

Google® Analytics lets you monitor visitors to your website by adding code to your site. This service requires a Google Analytics account.

  1. Follow Google’s instructions to create a Google Analytics account.
  2. Copy the Tracking ID script Google Analytics generates. (More info at Google Support).
  3. Log in to your Cheap Domain Registration account.
  4. Click Website Builder and click Manage next to the site you want to use.
  5. Click Edit Site, then click the three-bar icon (Manage Settings) and select Site Settings.
  6. Select the Site-wide Code tab, and then paste the HTML code into the top text entry field.
    enter code in field labeled Code to put between <HEAD> tags (all pages)
  7. Click OK, and then click Publish.

 Note: Once you complete the steps above, you should see data in your Analytics account within 24 hours.

You can create and connect a Facebook business page with a Website Builder Business Plus plan

With a Website Builder Business Plus plan, you can create a Facebook business page to match your Website Builder design theme and business information. This does not affect your Facebook personal page — only your Facebook business page. You must have a Facebook account to use this feature.

  1. Log in to your Website Builder Business Plus account.
  2. In the Dashboard tab, find the Social section in the right-hand column and click Connect or Create.
    In the Social section, click Connect or Create
  3. At the bottom of the Preview Mode’s Social tab, click Managebeneath the Facebook page preview.
    In the Social tab, click Connect Now
  4. Click Connect to Facebook, enter your information and click Log In.
    Log in to Facebook
  5. Click Okay when asked if you want 1 Social to manage your pages. This enables the 1-Facebook page matching.
  6. Choose Create New Page and click Next.
    Click Create New Page or use the Update Existing Page menu
  7. By default, the Customize Your Facebook Page imports your Cover/Profile photos from your Website Builder account, along with your business’s name, phone number, and website address. Select a business Category and enter a brief business description in the About field (required by Facebook).
    Customize your Facebook page

     Note: If you have what Facebook considers a location-basedbusiness, you’ll also need to include a business subcategory, phone number, and physical address (including your country).

  8. To replace your Profile or Cover photo, click its Remove button and then Upload Photo.
  9. Navigate to an image, select it, position the image cropper as needed, and click Crop and Save.
    Click Crop and Save
  10. Once the preview of the new photo appears, click Create Page.
    Click Create Page

     Note: If you decide that you want to create another page instead, click Back and return to Step 6.

  11. After your Facebook business page is created:
    • Click Visit Facebook Page to see the results.
      Check out your new or updated Facebook page
    • Or click Done if you want to return to the Preview Mode’s Socialtab.

Adding apps – Connect with your customers by adding spots for social media

Connect with your customers by adding spots for social media, YouTube, Google Maps, PayPal, and Yelp on your website. You must have a Business or Business Plus plan to add Paypal or Yelp.

  1. Log in to your Cheap Domain Registration .com account.
  2. In your Products list click Website Builder, and then click Managenext to the account you want to use.
  3. Click Edit Site.
  4. From the left-hand side, select the app you want to add. (If you want to add Email Marketing, Paypal, or Yelp, click Apps, then select the one you want.)

     Note: To add a YouTube video, you’ll need to click on the sample video that is displayed, then click Settings to input the URL of the video you want.

  5. Click Save after you’ve selected an app and followed the instructions to add it.
  6. Click Publish to update your site online.

Adding an audio player with Website Builder Business and Business Plus plans

With Website Builder Business and Business Plus plans, you can add an audio player to your website and even upload your own music. The audio widget only supports MP3 files. Each file cannot exceed 30 MB.

  1. Log in to your Cheap Domain Registration .com account.
  2. In your Products list click Website Builder, and then click Managenext to the account you want to use.
  3. Drag and drop the Audio Player onto the page, click inside the audio box, and then click Settings.
  4. To add music:
    • Click Manage Playlist.
    • Click Add Audio.
    • Browse to find the file on your local drive or drop it on to the screen.
    • Click Save.
  5. Under Options, select if you want your audio player to show your playlist, loop your playlist, shuffle your songs, or start automatically.
  6. To add album art or an image:
    • Click Add Image.
    • Select if you want to use a photo from your computer, a free image, Facebook®, or Instagram®.
    • Browse or connect to find the image.
    • Click Insert.
  7. Optional: Go to the Advanced tab to add or edit other effects for your audio player, including Background Color, Border, Shadow, Rounded Corners, Transparency, Margin, and to edit the Size of the box.
  8. Optional: Go to the Add Audio, Manage Playlists, Gearwheel to change author and title of song.
  9. Click Save.
  10. Click Publish to update your site online.

Enhance the look of your website by adding image slideshows and photo galleries to your website

Website Builder lets you enhance the look of your website by adding image slideshows and photo galleries to your website.

With image slideshows, you can showcase your images on your website through slide presentations. With photo galleries, you can display photos on your website that give your visitors the option to click them and view larger versions.

  1. Log in to your Cheap Domain Registration .com account.
  2. In your Products list click Website Builder, and then click Managenext to the account you want to use.
  3. Click Edit Site.
  4. Drag and drop Slideshow Icon for an image slideshow or Photo Gallery Iconfor a photo gallery onto the page, and then click Swap Images.
  5. From the Manage Photos window, click Add Photos, and then select one of the following options:
    • My Photos — Click Browse, to select an image you want to upload from your personal computer, and then click Open.
    • Free Images — To select images from our image library, enter a search term to find specific images in our image library, or select a category from the All categories menu.
    • Facebook — To import images directly from your Facebook® account, click Connect to Facebook, log in to your Facebook account, and then click Log In with Facebook.

       Note: To disconnect from Facebook, go to your Facebook account settings, click Apps, and then click X next to Website Builder.

    • Instagram — To import images directly from your Instagram® account, click Connect to Instagram, log in to your Instagram account, and then click Log In with Instagram.
  6. Select the images you want to use, and then click Insert.
  7. To change the order of your photos, simply drag and drop them into place.
  8. Click Save.
  9. Click Publish to update your site online.

Add a contact form – Website Builder 7

You can add a contact form to any page for gathering information from your site’s visitors. The default form includes fields for name, email, subject and message. You can add more fields or edit the existing ones, though fully customizable forms are only available for Business or Business Plus plans.

To add a contact form:

  1. Log in to your Cheap Domain Registration .com account.
  2. In your Products list click Website Builder, and then click Managenext to the account you want to use.
  3. Click Edit Site.
  4. Use the Page menu to select the page where you want to add or change a form.
  5. If you have a contact form on the page, move your cursor over the contact form and then click to select it. If not, from the left-hand toolbar, click Form to add a contact form to your page and then click on it.
  6. To remove an existing field from the selected contact form, move your cursor over the field, and then click Delete.
  7. To add a new field, click in the contact form to access the menu, and then click Add (the plus sign) in the floating toolbar. (You also can simply drag the form onto the page.)
  8. Click the type of field you want to add to the contact form:
    • Text – Adds a one-line, plain text field. Enter a text label for the field and then add placeholder text to populate the text field. This might be sample text or instructions, for example.
    • Multiline Text – Adds a multi-line, plain text field, such as a paragraph. Enter a text label for the field and then add placeholder text to populate the text field. This might be sample text or instructions, for example.
    • Multiple Choice – Adds a multiple choice, single answer, radio button option list. Enter a label, possibly a question, for the multiple choice list and then add the available options. These might be possible answers to the question.
    • Checkbox – Adds a multiple answer option list. Enter a label, possibly a question, and then add the available options. These might be possible answers to the question.
    • Drop Down – Adds a multiple choice, single answer option drop down menu. Enter a label, possibly a question, and then add the available menu options. These might be possible answers to the question.
    • Submit File – Adds a button to allow visitors to upload a file to the contact email message you receive. Files must be 10MB or less. Enter a label to display above the button, and then enter text to display on the button.
    • Date/Time – Adds a field that can display the date, the time or both. You also can set it to accept only future dates, allow date ranges or limit time entries to 15, 30 or 60 minute increments.
    • Address – Adds a plain text field where visitors can enter their street address. Enter a text label for the field. Placeholder text is defaulted, but can be changed.
    • Phone – Adds a plain text field where visitors can enter their phone number. Enter a text label for the field. Placeholder text is defaulted, but can be changed.
    • Email Address – Adds a plain text field where visitors can enter their email address. Enter a text label for the field. The placeholder text displays your default email address. To change it, right-click the email field, click Settings (the gear icon)and use the Email to: dropdown menu to select another address. Click Save to close the window.

       Note: The form will work well with up to 30 fields; there may be some performance issues with more than 100 fields. A work-around is to combine some of the field information if possible.

  9. Depending on the type of field you selected, enter the requested information. For any field, you can select Make this a required fieldto require visitors to fill in the information before they can send their message. The field is automatically added to your contact form.
  10. If you want to change the email address where this form will be sent, right-click the form to choose Settings (the gear icon), delete the address in the Email to: field, enter a new email address and click Save.
  11. After making all your changes, click Save and then click Publish to see your changes online.

Add HTML code to page – Website Builder 7

Need to add custom code to a particular page on your site? Website Builder v7 makes it easy with a drag-and-drop HTML tool. If you need to add code that will be applied to your entire site, see Change site settings . You should not use this tool to embed YouTube video. For that, see Adding apps.

While we are happy to explain how the HTML Code tool works, we cannot troubleshoot issues with any third-party code you might add to it.

Warning: Do not use this tool unless you’re experienced at hand coding with HTML. Do not copy and paste HTML code from third-party sources unless you trust that source and fully understand how the code works. To learn more about the dangers of malicious coding, see this Wikipedia entry on HTML script injection.

  1. Log in to your Cheap Domain Registration .com account.
  2. In your Products list click Website Builder, and then click Managenext to the account you want to use.
  3. Click Edit Site.
  4. Navigate to the page to which you want to add the code.
  5. Click the HTML Code tool in the left-hand toolbar. A new text box is added to the page, and the Settings window’s HTML Code Settingspanel opens.
    Paste or enter your code in the panel
  6. Replace all the code in the black panel by pasting in what you copied or by entering your own code.
  7. Click Save.
  8. Click Publish to apply the changes to your website.
  9. When the confirmation window displays, click the live link to see your site changes.

Next step

Add a downloadable file with text link – Website Builder 7

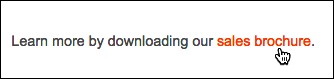
You can upload files — such as spreadsheets, Word documents, or PDFs (Portable Document Files) — with Website Builder. Your site’s visitors can then click a text link to download that document for offline use. Or if you prefer, you can offer that downloadable file using a button.

 Note: The files can be no larger than 30MB, and this method is not intended for uploading images or audio files. Instead, see Add imageand Adding an audio player. You cannot upload files ending with htm, html, htmlx, js, asp, aspx, mht, php, exe, gem, xpi or dll.

  1. Log in to your Cheap Domain Registration account.
  2. In your Products list, click Website Builder, and then click Managenext to the account you want to use.
  3. Once Website Builder launches, click Edit Site.
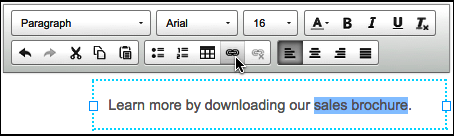
  4. Open the page with the text box containing the text you want linked and double-click inside the text box.
  5. Select the words you want linked and click the text editor’s chain-link button.
    select text and click chainlink button
  6. Next to Link, click the red arrow, then Upload
    Click Upload

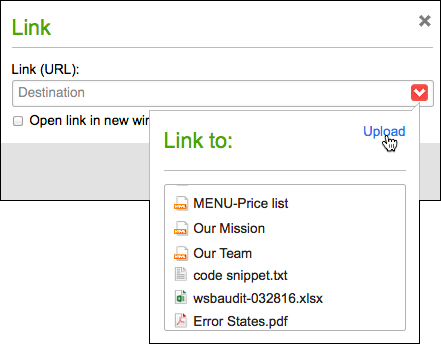
    Other options after clicking the red arrow:
    • Select a previously uploaded file in the Link to list.
    • Delete a previously uploaded file by clicking Upload and then click the file’s trash button in the File Manager.

  7. In the File Manager, click Browse to find a file on your local drive.
  8. After the file is added to the File Manager, click it. When the green checkmark appears, click Insert.
    After upload, click Insert
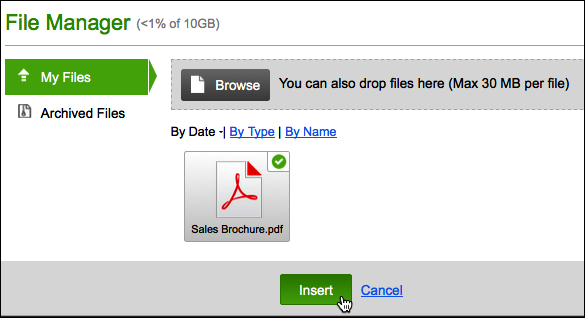
  9. Close the File Manager by clicking the x in the upper right and return to your page.

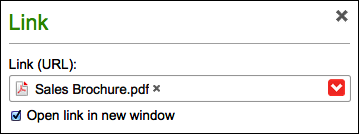
     Note: If you upload a text or PDF file, you can have it open in a new window by selecting the checkbox below the Link field. (Other file types, such as a spreadsheet, will simply download rather than opening in a new window.)
    Check Open link in new window.

  10. After making your choices, click Save at the bottom of the Settingswindow.
  11. Click Preview to see how the linked text will display in your website.
    Check Open link in new window.
  12. When you’re satisfied, click Publish and confirm your choice by clicking Publish again.
  13. A window displays a link to your site, which you can click to see the published changes. Or click Close.
  14. When your page reappears, click Exit Preview.

Next steps

  • For more on styling text’s size, style, and color, see Change text .
  • To change the background color, size, and border of the box surrounding your text, see Change text box.

More info