You can send any campaign you create in your account as an email. You can send it as many times as you want, and to any contacts in your Subscribers. You will also be able to send an existing campaign from your mobile device.
- If you haven’t already, log in to your Email Marketing account. (Need help logging in?)
- Find your campaign on the Campaigns page, and click the Sendbutton underneath the thumbnail.
Note: If you’re sending directly from the Composer, just click the Continue button in the bottom right corner of the composer page.
There are two steps to the sending process, but don’t worry! Your campaign will not send until you confirm everything after the final step.
Recipients Tab
- You have two methods of selecting people to send to:
- Send to individuals field: If you want to send a test to just yourself, or a few folks who aren’t collected in a list, just type them here. This field is optional.
Note: Anyone added to the Send to individuals field who is NOT already a member of your Subscribers will be added to your All subscribers list, when you send.
- Subscriber lists: Click Include next to any list you want to send your email to. Click Exclude next to any list you want to make sure the email does not send to. Read more about excluding lists, here.
Note: You can confirm your list selections on the right side of the page.
- Send to individuals field: If you want to send a test to just yourself, or a few folks who aren’t collected in a list, just type them here. This field is optional.
- Click Continue.
Details Tab
- Edit the following options, to your liking.
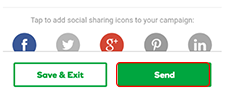
Option Details From Name This will default to your account name, the first time you send any email. For all subsequent sends, it will default to the last name you used. You can edit this each time you send. From Email This will default to your account email, the first time you send any email. For all subsequent sends, it will default to the last email you used. You can edit this each time you send. Subject This will default to the Campaign Title, the first time you send a mailing for any campaign. Any subsequent sends will default to the subject line previously sent. Second Send… This is optional. If you select this option, your email will automatically send again, in 72 hours, to anyone who did not open the first email, using the secondary subject line you enter. Don’t send this to people who already received it This is optional. If you select this option, people who have received this campaign before, will not be sent this email. Read more about this option. Enable link tracking Make sure this is selected. This allows Email Marketing to report back to you the details of what happened with your emails. Usually you don’t want to turn this off, since you won’t receive any statistics reporting if link tracking is disabled. Read more about mailing statistics, here. Make my email look awesome on all devices This is optional. Your email will be responsive with this option selected. Social sharing Select the social platforms you want to include in the sharing buttons, at the top of your email. These buttons allow your readers to like, tweet, pin, and +1 your campaign. - Click the Send button when everything looks good. But don’t worry! Your campaign will not send, yet — you have another chance to confirm all the details.
- Here’s your final chance to look everything over. All your recipient and mailing details are displayed for you, together, in one place. Click Looks good. Send it! to get your mailing on its way.
Note: If you need to make any changes to these details, click the Cancel link in the bottom left corner.
If this is your first-ever time sending, you may need to go through our quick verification step. Otherwise, your email is on its way!
Send from a mobile device
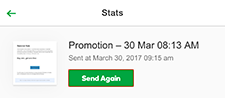
You can resend an existing campaign from your mobile device.
- Once you’re logged into your Email Marketing account, locate the campaign you want to resend.
- Tap Send Again to access the campaign.
- Enter the email address to where you would like to resend the campaign to.
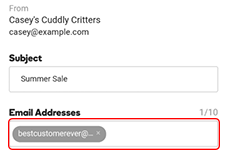
- Tap Send to resend your campaign.