You can block specific fax numbers in Fax Thru Email. Here’s how:
To Block a Fax Number in Your Fax Thru Email Account
- Log in to your faxthruemail.com account.
- Click the Blocked Numbers tab.
- Enter the fax number you want to block, and Click Block.

Cheap domain registration, hosting, ssl certificates, email accounts..
You can block specific fax numbers in Fax Thru Email. Here’s how:
If you have set a security code for Fax Thru Email, you can remove it at any time.
If your contact information changes, you can update your account settings for Fax Thru Email.
Note: You can change or reset your Fax Thru Email password on the Contact Information page.
When sending a fax through Fax Thru Email, you can create a cover sheet for your fax through the application itself.
Note: Selecting a different cover sheet template while sending a fax does not change the default template. To change the default template, select the template through your fax settings. For more information, see Setting Your Cover Sheet Options.
For more information about sending a fax, see Sending Faxes Using Fax Thru Email.
We also offer cheap email hosting service with spam-free, you will only receive the emails you want.
Note: If you do not have any pages to apply, click the Additional Fax Thru Email Pages Packs hyperlink to purchase more.
The pages pack adds to your account. To verify the pages remaining in your account, open your Fax Thru Email account, and go to the History page. You can also view them on the Account Overview panel.
You can use Fax Thru Email to send faxes to U.S. and Canadian fax numbers.
You can send faxes directly through Fax Thru Email’s Web interface.
You can send a Fax Thru Email message to any fax number using your email account. It doesn’t matter what email program you use, as long as the email address for the account matches the email address you listed when you set up your Fax Thru Email account. The “From” email address in your email client must be the same as the email address in your Fax Thru Email account.
Note: The “From” email address must match the “Account Email Address.” Fax Thru Email checks that these two addresses match when validating the outgoing fax. Also, if you enabled the Security Code feature, the system checks to ensure the security code you entered in the subject line of the email message is accurate and valid.
You can send faxes from your mobile device by logging in to the email account you use with Fax Thru Email on your mobile device. The “From” email address in your mobile mail must be the same as the email address in your Fax Thru Email account.
Note: The “From” email address must match the “Account Email Address.” Fax Thru Email checks that these two addresses match when validating the outgoing fax. Also, if you enabled the Security Code feature, the system checks to ensure the security code you entered in the subject line of the email message is accurate and valid.
Sending and receiving faxes via the Internet is easy with Fax Thru Email. You can select an area code you want associated with your Fax Thru Email account.
You may also set up a toll-free number to allow anyone to send you faxes without long-distance charges.
It can take up to 24 hours for a new Fax Thru Email credit to add to your Account Manager. Once it does, you can set up your Fax Thru Email account.
After you download and install Workspace Desktop Tools, you can use it to manage your Workspace Calendar. This functionality includes synchronizing Workspace Calendar with Microsoft Outlook® and displaying Workspace Calendar event notifications on the desktop of your computer. You can also customize settings for synchronizing Workspace Calendar with Outlook.
Note: Calendar synchronization is not available on Mac®.
If you do not already have Workspace Desktop Tools, see
Resources in Calendar represent facilities and equipment, such as meeting rooms, auditoriums, projectors, and other shared office equipment. When scheduling events, you can schedule resources to indicate that they are in use at that time.
Resources must be added to groups. Only the group’s users with Admin permissions can schedule resources, unless the resource is Public, which lets any group member schedule its use.
You can add resources to existing groups or when you create a group.
Note: Consider making a group just for your resources, and make all members of your organization members of the group. If you make the resources in the group Public, anyone can schedule a resource and all other users can see the resource’s availability.
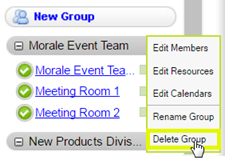
To delete a resource, right-click its group, select Edit Resources, and then click Delete next to the resource.
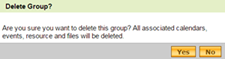
When you no longer need a Calendar group, you can delete it.
You must have administrator permissions to delete a group.
Caution: Deleting a Calendar group permanently deletes files and information associated with the group, such as events, resources, and files.